
Trailer Wiring Harness Melted: Immediate Actions, Causes and Repairs
Home » Trailer Wiring Harness Melted: Immediate Actions, Causes and Repairs
If you see a melted or scorched trailer plug, connector, or wire insulation, and smell burnt plastic, don’t assume it’s just a damaged plug. This is not a minor issue.
A melted harness indicates abnormally high heat somewhere in the circuit. Even if the fuse hasn’t blown, this circuit already poses a safety risk. Many beginners make the mistake of replacing only the visibly melted component – a new plug for a burnt plug, a new fuse for a blown one. This might temporarily restore function, but the underlying problem remains, and the new parts will overheat and fail again. Understand that the damaged part and the root cause of the damage are not the same thing.
Below, I’ll explain what to do immediately in this situation, what absolutely must not be powered on, which components cannot be reused, the causes of the failure, and a troubleshooting approach. You don’t need complex electrical knowledge; just follow these guidelines to avoid a superficial fix that leaves hidden dangers in the wiring.
What should you do if a trailer wiring harness melts?
If you find a melted, blackened, smoking, burning-smelling, or abnormally hot trailer harness or plug, do not test it by applying power. Stop using it immediately and disconnect all power sources. A melted harness means excessive heat was generated, likely due to a short circuit, overload, or poor connection. Continuing to apply power will worsen the damage, potentially harming the vehicle’s wiring or other components.
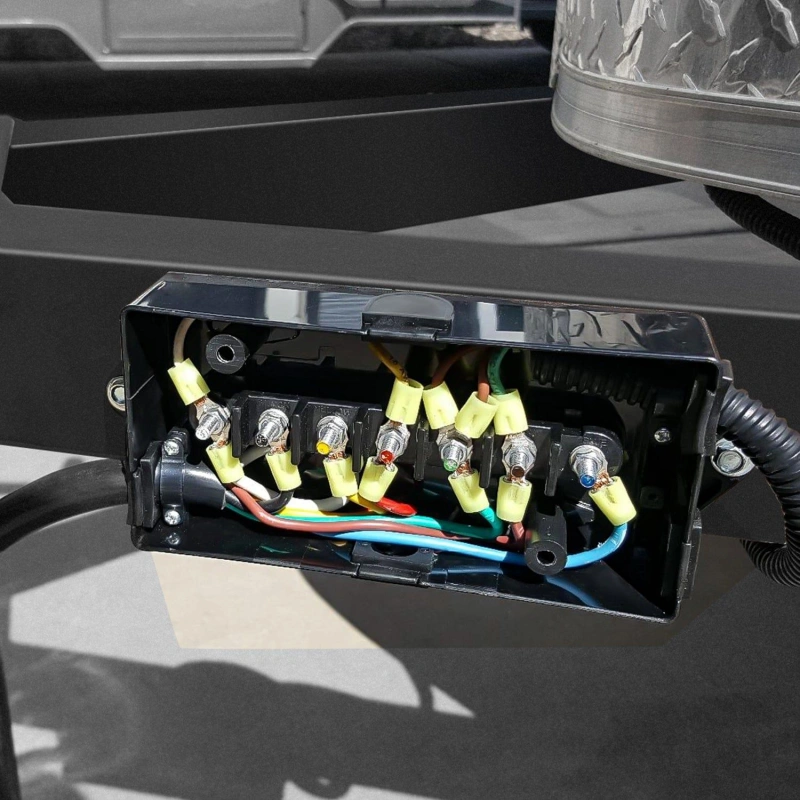
1. Immediately deactivate the trailer circuit
If you are driving, pull over safely and turn off the vehicle’s power. Do not repeatedly test the brake or turn signals; each activation can worsen the damage.
If the plug is already hot and soft, do not pull it out with bare hands. Deformed plastic and metal pins may have fused or shorted together. Even if you disconnect the trailer plug from the tow vehicle, the trailer’s own battery (if equipped) may still supply power. Disconnect the trailer’s internal power source for complete isolation.
2. Never re-apply power until the root cause is found
This is a critical principle.
Do not wait for the harness to cool down and then plug it back in. Harness melting doesn’t happen without an underlying circuit problem. Even if it works temporarily after cooling, the heat has likely weakened metal contacts and damaged insulation, making it prone to overheating again.
The correct sequence is: Disconnect power → Inspect damage → Find and fix the fault → Test with power.
3. After complete cooling, thoroughly inspect the damage
Don’t just look at the visibly melted spot; heat travels along the copper wire.
Focus on these areas:
- Plug housing for deformation or scorching.
- Metal pins for blackening, looseness, or bending.
- Wire insulation for bulges, hardening, or cracks.
- Wires sticking together.
- Copper wire appearing black or brittle.
- Signs of abrasion against sharp metal edges.
- Ground connection points for rust or heat damage.
If the damage extends inside the wire insulation, replacing just the plug housing is useless.
4. Do not just wrap it with electrical tape and continue using it
Minor outer sheath scratches can be taped. But if the insulation is melted or charred, tape cannot fix it. The insulation’s dielectric properties are compromised after high heat, and the copper strands may also be affected. This cannot be repaired with tape alone.
5. Do not just replace the fuse, and never use a higher-rated fuse
The fuse’s purpose is to melt and break the circuit when current is too high, protecting the wiring.
A blown fuse is a warning of a short circuit or overcurrent. Replacing it without finding the cause – especially with a higher amperage fuse – defeats the protection. The wiring will then overheat and potentially catch fire.
One important nuance: The harness can melt without the fuse blowing. Loose or corroded pins create high resistance, generating intense local heat, but the total current might not be high enough to trip the fuse. A fuse that isn’t blown does not mean the circuit is safe.
6. If there is still smoke or sparks, stop working on it yourself
If, after disconnecting power, there is still smoke, heat, or sparks – especially near the battery, fuel tank, plastic, or wood – stop investigating.
If you can’t handle it, seek professional repair.
7. The trailer cannot be used on the road if any of these conditions exist:
- Multiple wires melted together.
- Extensive harness charring.
- Damage has spread to the vehicle’s original wiring.
- Plug or socket severely deformed.
- Fuse blows repeatedly.
- New parts heat up immediately after installation.
- Cannot locate the fault.
- Trailer electric brake circuit is damaged.
Crucially, electric brakes are a safety-critical system. If the brake circuit is compromised, the trailer must not be towed until it is properly repaired.
Simple memory aid: See melting/smell burning → Stop immediately → Disconnect all power → Let it cool → Inspect thoroughly → Don’t power on hastily → Don’t upsize fuses → Fix the fault first, then test.
Important: Replacing the burnt plug or harness only replaces the damaged parts. The root cause remains, and new components will melt again. You must find and fix the underlying fault before restoring service.
Why does trailer wiring melt?
Harness melting is fundamentally caused by excess heat in the circuit. Normal circuits generate minimal heat. If current is too high, or connector resistance is abnormally high, the heat generated can exceed what the wire and plug can withstand, leading to charring and melting.
Troubleshooting requires distinguishing between two types of heating: overall circuit overheating and localized connector overheating. The repairs differ.
1. Short circuit to the frame or another wire
Worn insulation allows bare copper to contact the metal frame, creating a short to ground. This causes a large current surge that usually blows the fuse. If the fuse is incorrectly sized, the harness melts instead. Check areas where the harness passes over metal edges, through holes, or near hinges. Scorching near the frame doesn’t automatically mean a short; confirm with testing after disconnecting power.
2. Circuit overload or undersized wire
Adding extra lights or accessories increases current demand beyond the wire’s capacity. Or the wire gauge itself may be too thin, offering higher resistance and heating up under normal load. If a length of wire appears heat-damaged, prioritize checking the total load and wire gauge.
3. Loose, corroded terminals (most common cause of localized melting)
Loose, corroded, or poorly crimped terminals create high resistance points. Even with normal total current, these points generate intense local heat. The fuse won’t blow. Symptoms show as a single burnt pin or terminal, with the rest of the connector looking fine. Trailers exposed to rain and salt are highly susceptible.
4. Incorrect fuse, bypassed protection
Fuses protect the wiring, not the devices. Using an oversized fuse or substituting with wire removes overcurrent protection. Remember, a non-blown fuse doesn’t mean the circuit is safe; poor connections causing localized heat won’t trip a fuse.
5. Incorrect wiring, wrong pinout
Relying only on wire colors without verifying pin functions can lead to shorts or cross-connected circuits. In old or modified harnesses, wire colors are unreliable; always verify pin function.
6. Poor ground, unintended return paths
A loose or corroded ground connection prevents current from returning normally, causing ground point heating and lighting abnormalities. Don’t assume a melted wire is a ground fault without testing.
7. Plug not fully seated, mechanical damage
A partially inserted plug or worn socket contacts can cause intermittent connections due to vibration, leading to localized heating. Replacing just the plastic housing without fixing the terminals won’t solve the problem.
Two key diagnostic pitfalls: For localized single-pin melting, check the connector first – don’t jump to installing thicker wire. For full-length wire heating, focus on load and gauge.
Core logic: High current → whole wire heats up. High connector resistance → localized heating. Insulation failure/incorrect wiring → short circuit.
Replacing only the burnt parts is ineffective; you must find the heat source, or the new parts will also fail.
Where did the melting occur and what does it suggest?
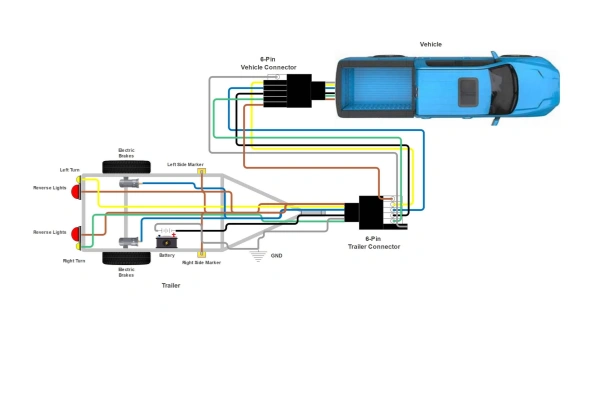
The melt location helps narrow the search, but the melt point is not always the fault source. Before removing damaged wiring, note the location of the initial heat damage.
Melt Location Priority Suspect
- Single connector pin Loose/corroded terminal, high contact resistance, pin overload
- Crimp joint Poor crimp, corrosion, insufficient conductor contact area
- Ground wire Loose/rusty ground, high contact resistance
- Isolated spot on a wire Abrasion short, crush damage, external heat source
- A length of wire Continuous overcurrent, gauge mismatch, external heat exposure
- Fuse holder Poor fuse/terminal contact, overcurrent, wrong fuse type
- Near conversion module Output short, power/ground fault, module or load failure
- Near a single lamp Local short, water ingress, terminal fault, device failure
How do you diagnose the circuit after disconnecting power?
If the trailer harness has burned or gotten hot, don’t just replace the fuse and apply power. First, disconnect all power sources – not just the trailer plug. Disconnect the trailer’s own battery, breakaway battery, etc., to prevent accidental power-on that could cause injury or further damage.
Step 1: Don’t start cutting wires yet. Examine the damage pattern first.
Note the first place that looks burnt: connector pin, crimp joint, ground point, fuse holder, wire run, module, or lamp. Look for abrasion, cuts, water ingress/corrosion, or proximity to hot parts like exhaust. The worst damage isn’t always the source, but it guides the search.
Step 2: Determine what the affected wire is supposed to do.
Don’t just look at color. Use the pinout diagram to identify the wire’s function. Trace it from end to end, noting any connectors and what device it powers. Correct any obvious wiring errors first.
Step 3: Check for shorts to ground (frame).
Set your multimeter to resistance. Test between the signal/power wire and the metal frame/chassis.
Important: Measuring some resistance doesn’t automatically mean a short. Bulbs, brake modules, etc., have internal continuity. Disconnect the load device before testing the wire alone.
Step 4: Check for open circuits (broken wires).
With power off, test continuity between both ends of the wire. If there’s no continuity, trace the wire to find the break (burned through, loose terminal, corrosion).
Step 5: Check for unwanted connections between wires.
Two different circuits should not be connected. If they show continuity, suspect insulation melted and wires contacted. Tape alone won’t fix this; find and repair the contact point.
Step 6: Physically check all connector terminals.
Continuity testing isn’t enough. Check ground terminals, crimps, plug pins, and fuse holder clips for looseness. A connection might pass a low-current continuity test but heat up under load. Power-off checks only find obvious opens/shorts; poor contact needs a voltage drop test under load.
Step 7: Check the ground connection.
Check the ground bolt for tightness, terminal corrosion, and paint/rust under the connection. A multimeter “beep” only shows some continuity; a corroded ground can still overheat under load. Off-circuit checks are just a first step.
Step 8: Check for fuse/protection modifications.
Verify fuse rating. Look for larger fuses, jumper wires bypassing fuses, or unauthorized direct battery connections. An intact fuse doesn’t guarantee the protection is correct.
Step 9: Separate tow vehicle and trailer, diagnose separately.
Unplug them. Test the vehicle side socket for correct output, and test the trailer side harness for shorts or wiring errors. This isolates the fault.
Step 10: Do NOT apply power until the fault is found.
Ensure shorts, cross-wiring, damaged plugs, and poor grounds are repaired before installing a fuse and applying power.
Only after all repairs should you power on, test functions under load, and perform voltage drop tests to confirm proper operation with actual current flow.
Summary process: Disconnect all power → Observe damage location → Identify wire function → Check short to ground → Check short between wires → Check for open circuits → Inspect terminals/grounds → Verify fuses/protection → Repair faults → Power on and test under load.
How do you prevent the harness from melting again?
Once a trailer harness has burned, simply replacing the burnt wire and plug is not enough. If the root cause – short, poor connections, bad ground, wrong fuse, overload – isn’t addressed, the new harness will also overheat and melt.
Core prevention process: Find root cause → Restore correct wire gauge → Restore correct protection → Eliminate high-resistance connections → Ensure reliable ground → Route wiring properly → Perform load-based verification.
Detailed steps:
- Identify the root cause: Understand why it melted. Common causes: worn/shorted wire, overload, thin gauge, loose/corroded terminals, poor ground, wrong fuse, incorrect pinout, proximity to heat. Without finding the cause, repairs are pointless.
- Match wire gauge to the load: Not all wires need to be as thick as possible, nor use one size. Light circuits, brake circuits, and 12V power have different current needs. Use the gauge specified by the original manufacturer.
- Never modify fuse ratings: A blowing fuse indicates a fault, not a need for a larger fuse. Using a larger fuse or bypassing it guarantees the harness/plug will melt. Each circuit must use its specified fuse rating.
- Don’t remove or bypass protection: Remove all jumper wires over fuses or unprotected direct battery connections. Without protection, a short will burn the wiring.
- Eliminate all poor connections: Most melting isn’t from overload, but from high-resistance connectors. Loose, corroded, blackened, or weak terminals, crimps, fuse clips, and ground bolts must be repaired or replaced. A connection that passes a continuity test can still overheat under load.
- Ground properly: A loose, rusty, or painted-over ground causes stray currents, heating, and light interference. Ground points must be clean, bare metal, and tight. Never rely on the hitch ball or mechanical connection for grounding.
- Wire by pin function, not color: On old or modified trailers, wire colors are often unreliable. Always connect based on pin function, not matching colors. After wiring, test all functions: lights, brakes, reverse, power.
- Route harness away from hazards: Keep wires away from exhaust, sharp edges, and moving suspension parts. Many failures are from physical abrasion or heat, not electrical faults. Use protective sleeving and secure the harness properly.
- Relieve strain on the plug: Unsupported harnesses transmit vibration and pull directly on the connector pins, causing looseness and heating. Secure the harness to remove strain from the plug.
- Recalculate load when adding devices: Adding lights or accessories can easily overload circuits. Before adding, verify the wire gauge, connector, and fuse can handle the additional current. Signal wires must never be used as power feeds.
- Test under full load after repairs: Continuity checks aren’t enough. Problems often appear only under operating current. Test with all lights, brakes, and power accessories on. Measure function and check for heat; voltage drop testing is recommended.
- Re-inspect after the first trip: Vibration, heat, and moisture can affect new repairs. After the first tow, re-check new connectors, plugs, grounds, and fuse holders for heat, discoloration, or looseness.
When should a professional inspect the vehicle and trailer?
Not every trailer wiring fault requires a professional. Bulb changes, minor plug oxidation, or a clearly identified localized wire abrasion can be DIY if you have a diagram and testing tools.
Seek a professional auto electrician if:
- Harness smoked, charred, or insulation melted: If wires, plugs, or terminals are deformed or smoked. Hidden damage may exist within the vehicle’s original harness. Cutting out the visible damage may not fix the cause.
- Correctly rated fuse blows repeatedly: If the correct fuse keeps blowing, there’s abnormal current. Don’t keep replacing fuses or upsize them. If you can’t find the short after basic checks.
- Same location overheats again after repair: If new plugs/wires/terminals heat up again, only the symptom was treated, not the cause. This often requires measuring operating current, voltage drops, and ground circuits – beyond basic continuity testing.
- Damage involves the vehicle’s original wiring: If the meltdown is behind the vehicle’s 7-way socket, in the OEM fuse box, factory tow harness, or brake controller wiring, and the vehicle shows related warnings. OEM wiring involves modules; don’t cut without diagrams.
- Brake controller reports persistent short/overload faults: If the controller keeps reporting short, overload, or ground faults, and you can’t isolate whether the problem is in the vehicle, plug, trailer, or brake magnets.
- Electric brake or breakaway system issues: Burnt brake wire, inconsistent braking, locked brakes, total brake failure, or breakaway system malfunction. These are safety-critical; don’t tow until diagnosed.
- Vehicle-side fault remains with trailer disconnected: If the brake controller still shows errors with the trailer completely unplugged, the fault is in the tow vehicle’s wiring. Seek help.
- Modified wiring is very messy/unidentified: Junction boxes with random splices, unknown wires, extra connectors, missing fuses, unclear current paths. Requires professional circuit tracing.
- Cannot find pinout, wire gauge, or fuse specs: Don’t guess. Seek professional help if you can’t find the necessary specifications.
- Diagram is correct, continuity tests pass, but still overheats, blows fuses, or malfunctions: If all basic static tests pass, but problems occur under load, this requires load-based current and voltage drop testing. Don’t keep guessing.
- Safety functions are affected (brake lights, turn signals, electric brakes): If safety systems are involved, and you cannot be certain of correct operation, do not tow. Seek professional assistance.
Important: Lights turning on doesn’t mean the circuit is safe. For repeated overheating, OEM wiring damage, electric brake issues, or messy modifications, prioritize professional diagnosis over trial-and-error parts replacement.
Frequently asked questions about melted trailer wiring
Can a bad ground melt a trailer plug?
It’s possible, but you can’t attribute the melting of the plug to bad grounding.
Grounding is bad, that is, the path of the current back to the negative pole is loose, rusty, and the resistance becomes larger. Common phenomena: the taillight dims, the light flashes randomly, the failure of multiple lights working together is more obvious, and the electric brake loop is abnormal. If the resistance of the grounding position or the internal grounding position of the plug is large, the power will gather heat, causing the grounding terminal to burn and melt.
However, it should be noted that the plug is melted, and you can’t just add a ground wire to finish it. It is also necessary to check the loose corrosion of the terminal, the size of the load, whether there is a short circuit, and whether the pin wiring is correct.
If multiple lights interfere with each other, and the grounding screws and terminals are rusted and loose, the grounding problem should be suspected first. If it is just a single pin that is blackened and melted, it should focus on the contact and carrying current of the terminal itself.
Why did the connector melt without blowing the fuse?
The current of the fuse tube is too high. In many cases, the local contact resistance of the plug is too high, and the total current of the loop does not reach the fuse melting value. The 7-way plug pins are rusty and loose, the contact metal area becomes smaller, and the overall current is normal, but the heat is concentrated in small contact points, baking the plastic shell.
Can melted wires be taped and reused?
The hot-melted wires should never be wrapped with tape and continued.
Only if the outer skin is slightly scratched and the wires inside are intact, it can be repaired with special tape or heat-shrinkable tube. As long as the damage is caused by the heating of the circuit, such as melting and burning the outer skin, exposing copper wires, hardening and brittle wires, several wires sticking together, blackening terminals, and wrapping tape is useless.
The reason is very simple: the first is that the high temperature has burned the copper wire and internal insulation, the tape can’t repair the internal damage, and the power is still hot; the second is that the plug, the terminal is loose, corrosion, poor contact and other fundamental problems, the tape can’t cover; the third is that the tape only covers the ugly, hides the fault, and the problem has not been solved. Burn the line again in the morning and evening.
What fuse size should a trailer circuit use?
There is no unified fuse specification for the trailer circuit. The load of each circuit of lighting, electric braking and 12V power supply is different, and the fuse size is also different. You can’t copy other people’s 10A or 30A.
Prioritise the manufacturer’s requirements of the vehicle manual, wiring harness and brake controller, and use as much as the manufacturer stipulates.
If the insurance is too large, it will not melt when the short circuit is overloaded, and the wire plug will burn and melt first.
However, if the insurance is too small, it will melt frequently in normal use. Don’t change the big insurance directly, but troubleshoot the fault.
After the wire harness is burned, don’t choose according to the old fuse removed. It may have been changed privately before. If you can’t find the exact parameters, don’t try the insurance repeatedly. First find out the root cause of the fault before powering on.

Nicole
The founder of Linkwings Electronics.
10+ Years Experience | 1000+ Global Projects Completed
Specialized in:
- Custom Wire Harness Assembly
- Automotive & Industrial Cable Harness Manufacturing
- Precision Crimping & Terminal Processing
- OEM / ODM Wire Harness Solutions
Need help with your project?
Let Linkwingselec deliver your next wire harness solution.